GMC Motorhome
New Owner Safety & Usability Check List
Compiled primarily from references
on Gene Fisher’s excellent website, with input from the GMCnet
and other owners.
I claim no ownership of this data, just compiled it in to
one document that can easily be printed and handed to a prospective owner.
Subject to constant revision (and
occasional controversy!)
Terry Taylor
15 August 2005
Other items to look at and/or add:
Safety
Checklist
There
are maintenance / upgrades that should be made to the GMC before they hit
the road the first time. These are items that will hurt you or let you
down. If you read the literature, there are bad stories of coaches
burned up, crashed with no brakes, etc. I think we can avoid most of these
with good maintenance. This might become a prioritized list of maintenance items.
But some of these are upgrades that do not appear in the shop manual.
1
Service your
bearings now (30,000 miles) or you will have a failure. If you didn't do it, it
did not happen.
2
Tighten
your lower ball joints at least every time you grease the front end or your
will have a lower
control arm failure.
3
If
your tires are over 5 years old, you are past the OEM warranty. Good time
to change the tires. Look on the sidewall for this label

4
Third
week of 96 \ In
the year 2000, the serial number went to an 11-digit number allowing for a four
digit serial week code to identify new decade.
5
General
consensus says if you have 100,000 miles on your 20 year old coach, you
need new:
a.
Engine
b.
Master
Cylinder
c.
Vacuum
Booster
d.
Fuel
Lines
e.
Fuel
Pump
f.
Water
Pump and Fan Clutch
g.
Brake
Cylinders (rear) and Calipers (front)
h.
Brake
Flex Hoses
i.
Brake
Linings and Pads
j.
Alternator
k.
Shock Absorbers
l.
Oil Cooler Lines
These
are going to leave you broken on the road. This is not to say a broken
gear tooth or an errant duck through the radiator will not still get you.
Failure of the items above are most likely to happen to you. (most of
them have happened to most of us).
Other items to look at and/or add:
- Transmission
vent, drain hose(vent has burned up several coaches)
- Steel gas line to the engine
- Wire electric gas
pump through the oil switch and Ignition
- Replace Rear
Battery booster cable
- Replace fire
extinguisher
- Replace isolation pads near the air tubes for
the suspension
- Test propane system for leaks / bad regulator
- Replace rubber brake lines
- Add a vacuum
backup for the brakes
- Replace
front bearings
- Replace rubber gas lines(including generator)
- Check steering and suspension
- Replace tires over 5 years old
- Use auto-reset circuit breakers on rear lights
and air system
- Modify Davo
bunk bed to keep from smashing fingers
Lower Control Arm Failure
If your
lower ball joints are held to the control arms with bolts, your lower control
arm is at risk. The holes for these bolts might be egg shaped from loose
bolts or improperly drilled out rivets. This puts a lot of stress on the ball
joint hole at the end of the lower control arm and eventually failure of the control
arm. I have heard of rivets becoming loose
but it seems most of the failures have come after maintenance has replaced the
lower ball joint.
WHAT TO DO
Check the bolts on the
upper and lower ball joints at every lube and bearing check.
Check the tip of the lower
control arm with a sharp scribe or at least a finger nail looking for cracks.
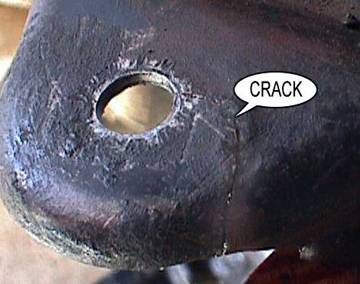
The crack in the
control arm shown in the picture could have easily been found this way.
This control arm was from an active GMC and had not yet failed. The GMCMM
article Jan99, points out that this procedure will not find hairline
cracks. You would need to tear down the suspension and carefully check the
area around the hole.
If the bolts will not stay
tight, the ball joint should be replaced and possibly drilled out for larger
tight bolts. (I am not sure green goop (locktight)
will help, but it cannot hurt)
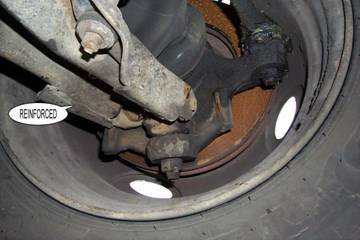
Standard A-Frame
This picture shows the
standard reinforcement that GMC provided on the A-frames. After-market
suppliers can provide even more reinforcements.
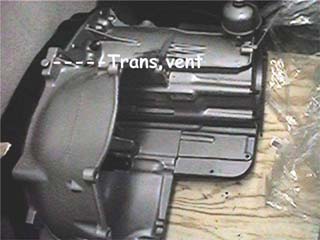
Transmission Vent Extension
There
is an elbow that will go into the vent hole after removing the vent. You can
remove it with a pair of wire cutters by squeezing and lifting. The elbow, GM
part number 865-2580 is stocked in
Oil
escapes from this vent if the transmission is over filled, during a catastrophic
failure of the transmission and some modes of normal operation. The oil
then drops directly onto the exhaust system and has caused many fires in GMC
motor homes.
Wes
Caughlan had an article and inexpensive solution for the Trans Vent overflow
problem in the June '98 issue of GMC News. He used 38" of 3/8
"fuel line hose, GM PCV hose # 25508425(for elbows) and vent cap #8460496.
Use one of the elbows to attach to vent of transmission, connect with short
length of 3/8 copper tube to 3/8 fuel line hose run into aluminum u
channel under floor attach vent cap on end. This places the 'vent' out of harms
way.
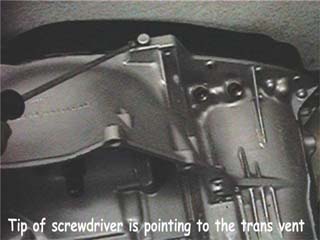
The vent you are looking for is located on top at the front of the
transmission. With the engine cover off, if you look down just below the
firewall you will see a small metal cap, that is if it is original. This cap is
covering the vent tube. This vent is what is replaced with a tube or hose to
route transmission fluid away from exhaust and hot parts. The cap is
crimped onto a notched steel tube and can be popped off. The tube is
pressed into the transmission and can be pulled out. You can attach a molded
rubber 90' elbow to the original tube or replace the tube with a threaded
fitting.
My vent was extended over to a coolant recovery tank mounted behind the
wheel well. This was to catch the overflow.

Hard
to see but connector has been added
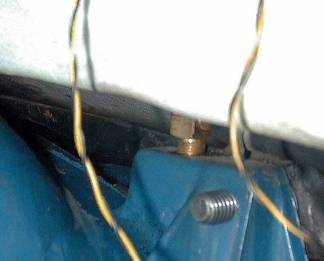
pix
by Mr.C
Pictures
by Steven Ferguson
Transmission
Vent...Not as easy as it sounded. Removing the darn OEM vent creates
fragments as the vent is equipped with circular barbs which displace
transmission case metal in order to retain it. The vent was free to
rotate but was very resistant to removal until the barbs enlarged
the opening in the case. I cleaned out everything I could find but a
transmission fluid change is probably in the near future.
The
OEM vent had a machined ring-like hat at its top with a OD of 0.50" but a
height of only about .150" or less, far too thin to use with a 1/2"
hose. If one were to grind off the top hat, it would leave a short
cylinder stub of about 0.35" diameter, a little small for the 3/8"
tubing. I ended up using 3/8" copper tubing, tapering it to
about .350" to wedge into the transmission case hole (~.35" diameter).
It seems secure but I still don't like the idea of the metal bits created by
removing the original vent. Nothing's quite as simple as it first
appears.
Electric Fuel Pump
The question is, should you bypass the mechanical
pump altogether, remove it and block off the opening, or can you run the
electric pump together with the mechanical?
Most owners leave the mechanical pump
on. It is possible for the diaphragm to leak into the engine with or
without the electric pump. (see the note farther
down )*
One "booster" connection for the electric pump is to power it on with
the gas tank selector switch so that the electric pump only comes on with one
or the other tank.
You can power it from the center terminal of the diode isolator. Good time to
test your isolator to see if it is working and if you remove the isolator
someday you will have to rewire.
Good time to mount a filter by the electric pump and remove the filter from the
input to the Carb.
Use only the best rubber hose. It has been suggested to use
injector hose because it lasts longer.
You can run the electric pump all the time, (and why not ?)
one thing less to remember when you are having problems with vapor
lock. Keeping it simple is a good idea. Fewer
connections, hoses, components, etc.

The circuit above will allow the pump to run
during cranking or only when there is oil pressure.
This
year (2005) there was a suspicion that a bad mechanical gas pump destroyed 3
engines. The first was the OEM engine, the
rebuilt engine used the old pump and lasted only a short while. The next
rebuild also used the same pump and lasted only a short while. This time
it was determined there was a small leak in the diaphragm of the pump which was
pumping gas into the crank case. This does not happen often, but it
does happen and may be hard to detect.
Electric fuel Pump Part Number
The model # is Carter P4070 Summit
Racing had it for about $56.
Another idea:
I
run the Carter 4070 on our GMC. I also have a fuel pressure gauge mounted on
the outside of the windshield. When I first installed the electric pump I put
it after the selector valve so I could opperate it
with either tank. What I found was I had between 5 to 6 pounds of fuel pressure
using the elecric and mechanical pumps. When I shut
off the electric pump the fuel pressure would drop down to 3 pounds. With the
electric pump bypassed I was back up to 5 pounds.
I
remounted the electric pump before the selector
valve and connected it to the reserve tank only. That way if I need the
electric pump I just switch to the reserve tank. This way there is no drop in
fuel pressure while running on the main tank
which is what I do.
Anyone
looking for an oil pressure switch that will shut the electric pump off, go to
any auto parts store an ask for a oil pressure switch
for a 1977 Chevy Vega. This is the one to use and is cheaper then the one from
Electric Fuel Pump Pressure
After
checking out the suggestions made, I determined that the pump pressure was too
high, 8 1/2 PSI.
Fortunately I did not find the pump that I was after at any of the three parts
stores in town. Did some more checking at the pump and found the positive and
negative reversed. This turned the pump in the wrong direction. Switched the
wires and the gas line hoses and now it works fine. My eyes are no longer what
they should be. What I have learned is that the pump puts out more pressure in reverse Frank
I mentioned the surging on long grades. Somebody said it might be starving for
fuel. I thought I should be able to see that on my fuel/air meters. I left
the electric fuel pump off today.Came to a long
grade. Stepped on it real good---. When the secondaries kick in the meters go to rich and stay there.
Sure enough close to the top the meters went to normal then lean and the lady
began to surge. Hit the pump----meters went rich and the surging stopped. It is
neat when your toys confirm what you think might be
wrong. Arch